
No matter if you are an experienced developer or new to integration, this blog will guide you through creating your first Mule application step by step.
But before delving into the steps, let us first understand the basics!
What is MuleSoft?
MuleSoft is a popular and powerful platform that provides a seamless way to integrate various systems and applications within an enterprise.
What is MuleSoft used for?
MuleSoft Anypoint Platform streamlines API discovery and building, allowing for faster application development and delivery. Moreover, the one unified platform allows you to design, implement, secure, and scale APIs and integrations across many protocols, as well as test them in a variety of ways.
How to Create Your First Mule Application Step by Step?
Understanding Mule ESB
Before diving into the creation of a Mule application, it is essential to understand what Mule ESB is. Mule, as an integration platform, allows you to connect applications, data, and devices both in the cloud and on-premises. Further, it is a lightweight Java-based ESB and integration platform that can handle many integration scenarios.
Setting Up Your Development Environment
The first step in creating a Mule application is setting up your development environment. You will need:
- Java Development Kit (JDKMule is a Java-based platform, so you need to have the JDK installed on your machine.
- Anypoint StudioThis is MuleSoft is integrated development environment (IDE) and simplifies the process of developing, testing, and deploying Mule applications.
Downloading and Installing Anypoint Studio:
- Visit the MuleSoft website and download the latest version of Anypoint Studio.
- Follow the installation instructions based on your operating system (Windows, macOS, Linux).
- Launch Anypoint Studio and configure the workspace.
Creating Your First Mule Project
Upon launching Anypoint Studio, you will have to define your workspace. This workspace is where your Anypoint Studio project files will be stored on your computer. Moreover, after setting up Anypoint Studio, you are ready to create your first Mule project:
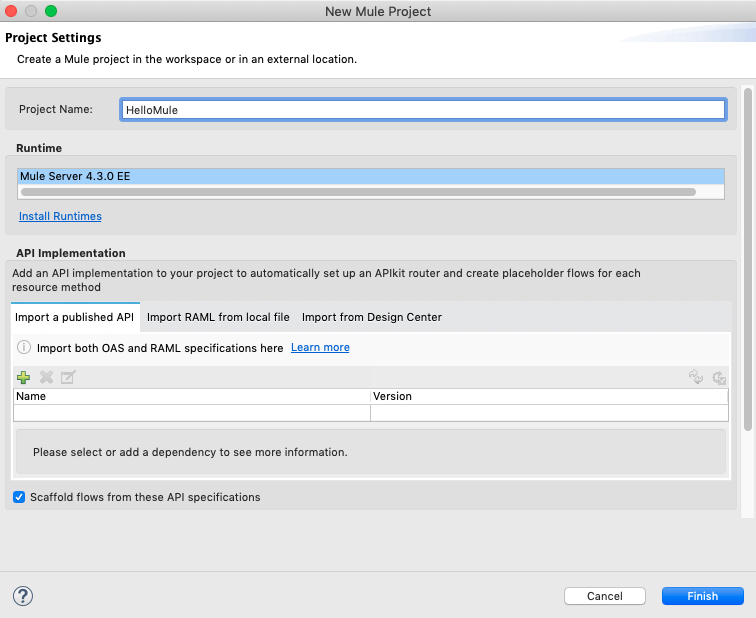
3.1. Create a New Project:
In Anypoint Studio, go to File > New > Mule Project. In the Project Name field, enter the value HelloMule and, select a Mule runtime version, and then click Finish.
3.2. Designing the Flow:
Mule applications are built around flows. A flow is a sequence of message-processing events. Use the drag-and-drop interface in Anypoint Studio to add components to your flow.
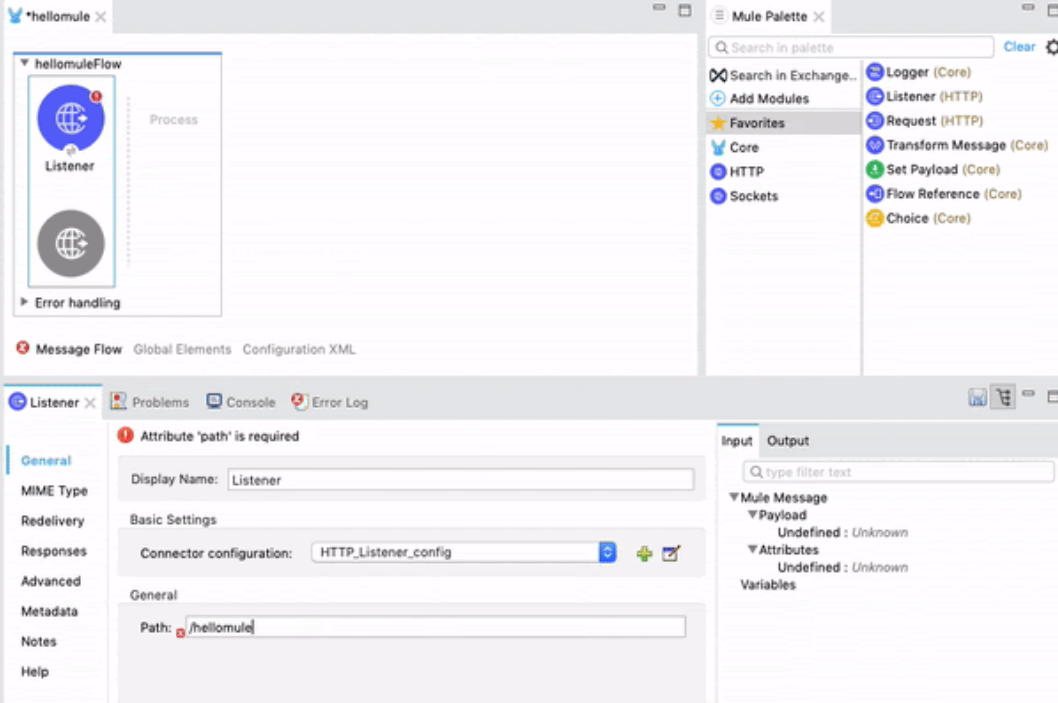
3.3. Adding Components:
The HTTP module should be pre-installed in your Mule Palette. If it is not present, you can add it by selecting Add Modules. Then, simply drag and drop the HTTP module from the right side to the left side in the Mule Palette. In addition, this process is how you incorporate new modules or connectors into your Mule Project.
Start with a simple HTTP Listener as a source to trigger your flow. Next, click on the HTTP Listener connector; then, under General > Path, type in: /hellomule. The path you set is where your system will run your flow when it gets an HTTP request.
3.4. Configuring Components:
Next, add the Set Payload connector to your flow in the Process section. Further, look for the Set Payload connector in the Core module of your Mule Palette. After that, turn off the “fx” button and enter the text "Hello Mule." Now go to File > Save to save your project.
Testing Your Application
Once your basic flow is set up:
4.1. Run the Project:
Click on the Run button in Anypoint Studio to start your application. Ensure there are no errors in the console and that the application starts successfully.
4.2. Testing the Flow:
Use a tool like Postman to send a request to your HTTP Listener URL. Check the console in Anypoint Studio to see if the Logger component outputs the expected message.
Deploying Your Application
After testing and ensuring everything works as expected:
Export Your Application:
In Anypoint Studio, right-click on your project and select Export. Choose to export as a Mule Deployable Archive (.jar file).
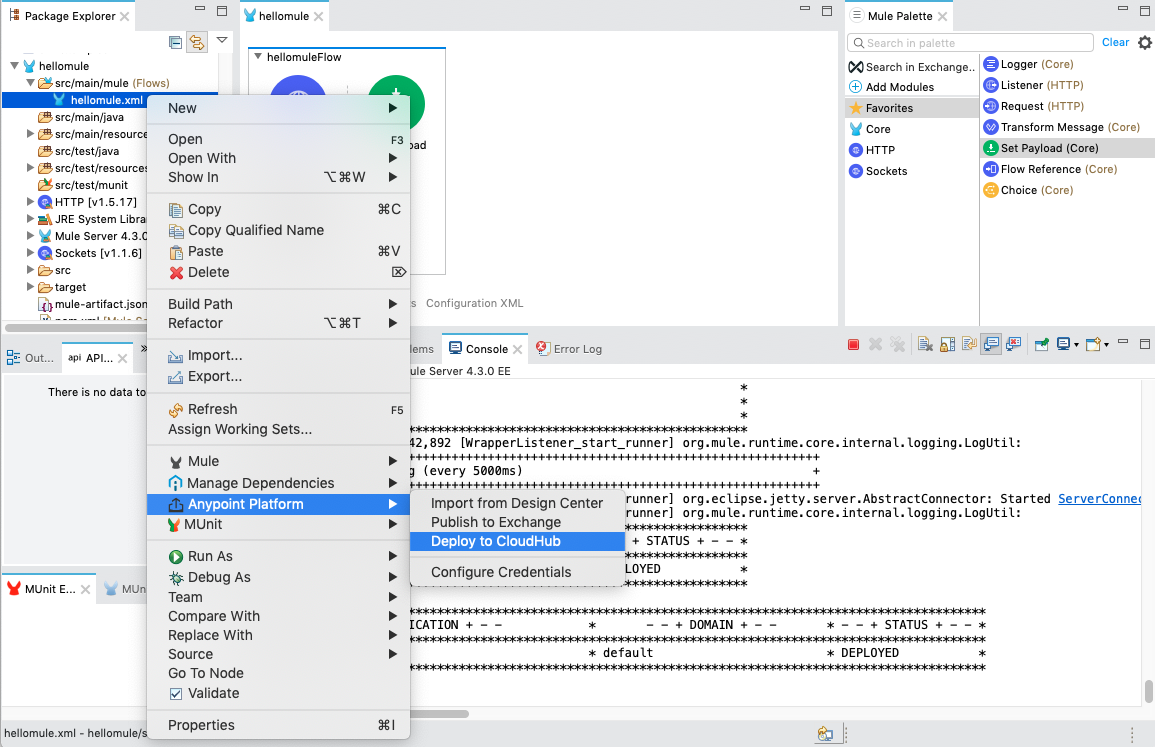
Deploying on CloudHub or a Local Server:
You can deploy your application on CloudHub directly from Anypoint Studio.
MuleSoft Best Practices
- Version Control: Use version control systems like Git to handle your source code.
- Error Handling: Implement proper error handling in your flows.
- Testing: Write unit tests for your flows using MUnit, MuleSoft testing framework.
Next Steps
- Explore More Components: MuleSoft offers a wide range of connectors and components. Experiment with them to extend the functionality of your application.
- Learn DataWeave: DataWeave is MuleSoft is expression language for data transformation.
Conclusion
Creating your first Mule application might seem daunting, but with Anypoint Studio, it becomes an intuitive and straightforward process. By following these steps, you will be well on your way to developing robust integrations using MuleSoft is powerful platform.


Comments